While this is great if you happen to like Unix-like operating systems, it might not be such an exciting fact if you’re more used to something like Microsoft’s Windows operating system lineup. If you happen to be one of the Mac users that don’t like using macOS, or are thinking of switching over to a Mac computer from a PC, you might be happy to know that there is indeed a way to install Microsoft’s newest operating system, Windows 10, on a Mac computer. We’ll be going through the process of installing Windows on a Mac computer in this article, so if this is something you’d like to attempt yourself, read on! First things first – before we begin with the process of installing Windows, you need to make sure that the Mac device you’re planning to use can handle it properly. The device will need to meet certain hardware and disk space requirements in order to successfully run Windows 10. Generally speaking, if your Mac device was made in the last 6 years or so, you should be fine – but make sure to check the following link in order to make sure that your device can properly run Windows 10 before proceeding: https://support.apple.com/en-us/HT201468 An important thing to note is the fact that in order to install Windows 10 on a Mac device, it’ll need to have an Intel processor. Also, unless you’re using an Intel-based Mac model with the OS X El Capitan (or later version) operating system, you’ll need an external USB flash drive. The link below if you need to check whether your device requires an external USB flash drive or not: https://support.apple.com/en-us/HT201468#more The last important thing to know here is the storage space requirement – your Mac computer will need to have at least 64 gigabytes of free space. (however, Apple goes a step further and recommends having at least 128GB of free space for a better user experience, due to the fact that even when you install Windows 10 on your Mac computer it’ll still have macOS stored on it).
How to install Windows on your Mac device?
Alright, now that we’ve gone over the requirements your Mac computer needs to meet in order to successfully run Windows 10, let’s get right into the installation process itself. Obviously, if you’re planning to install Windows 10 on your Mac computer, you’ll need to obtain a Windows 10 ISO file which you can use for installing the system. Keep in mind that Windows 10 is not an open-source operating system, so you will need license in order to use it. You can follow the link below in order to obtain a digital license for Windows 10: https://www.microsoft.com/en-us/windows/get-windows-10 Once you’ve obtained a digital license for using Windows 10, you can follow this link in order to download the Windows 10 media creation tool: https://www.microsoft.com/en-gb/software-download/windows10
media creation tool
In order to create a Windows 10 disk image using the media creation tool, follow the steps below:
Open the Windows 10 media creation tool (it may take a few minutes to load, depending on your computer specs)Click ‘Accept’ on the license terms screen
Check the ‘Create installation media (USB Flash drive, DVD, or ISO file)’ radio button and click ‘Next’
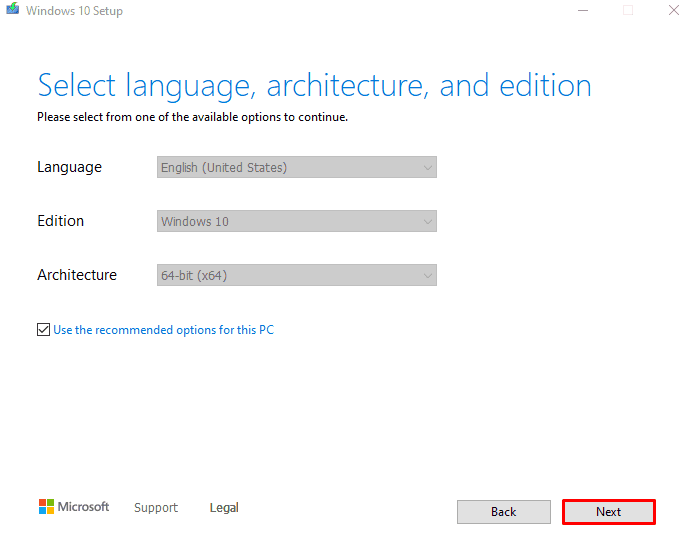
Set the language according to your preference and choose the system edition you’d like to use – if in doubt, tick the ‘Use recommended settings for this PC’ checkbox and click ‘Next’
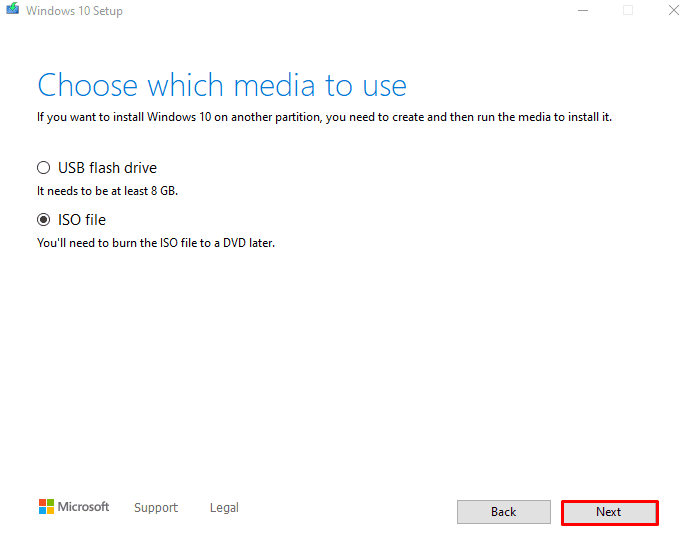
Check the ‘ISO file’ radio button on the next screen and click ‘Next’ (this will create a Windows 10 disk image as an ISO file you can use in order to install Windows 10)
Choose the location where you want to save the image file – make sure to remember where you set this, as you’ll need to locate and use the ISO file later
And once you’re done with selecting the location you want to store the image file at, the creation tool will work its magic for you. It may take a bit of time, once again, depending on the specifications of your computer – so just leave it running until it’s finished. Now that we have prepared both the license and ISO file for Windows 10, we can start installing it on a Mac computer. First, you’ll want to make sure that the Secure Boot setting on your Mac computer is set to ‘Full Security’ – this is the default setting, so if you haven’t changed anything you can skip this step. If, however, you changed the Secure Boot setting to ‘No Security’, you’ll need to change it back while installing Windows 10 – once the installation process is finished, you can switch it back without any negative effects.
Secure Boost
In order to change your Secure Boot settings, follow the steps below: With Secure Boot options out of the way, we can proceed to open Boot Camp and install Windows 10. Follow the steps below in order to do so:
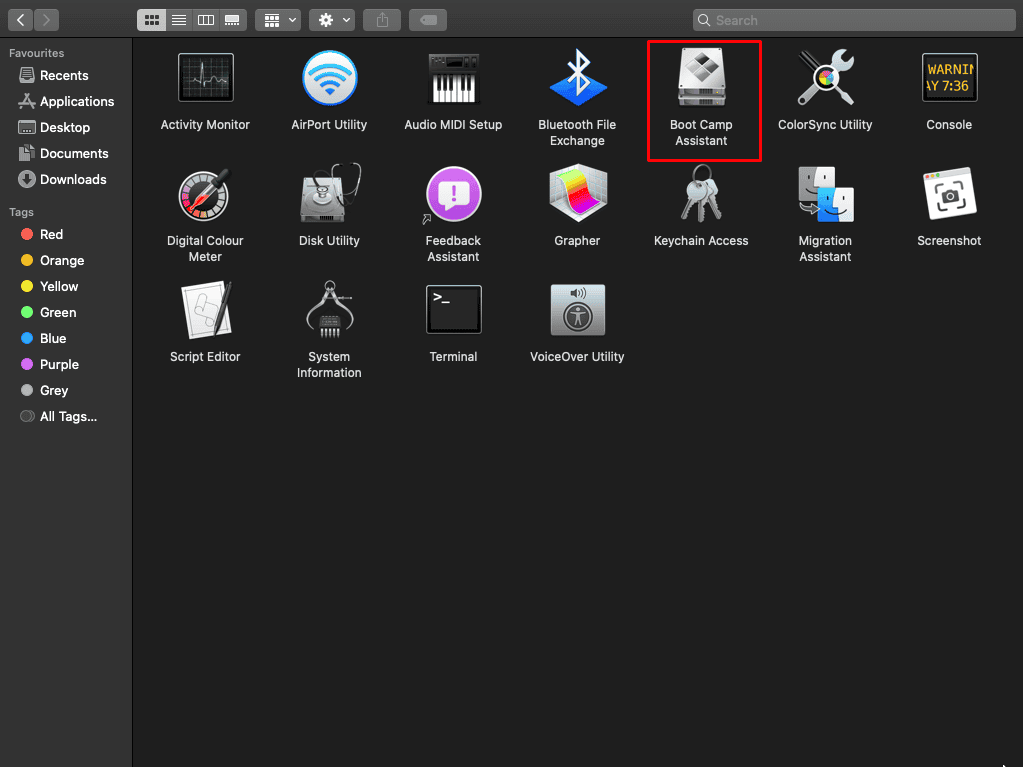
Click ‘Go’ on the menu bar while Finder is activeSelect the ‘Utilities’ option in the drop-down menu (alternatively, press the Command and U buttons on your keyboard simultaneously)
Click on ‘Boot Camp Assistant’ in the window that popped up
A window will pop up, describing the Boot Camp Assistant application; it’ll also notify you that it is important to perform a backup of your hard disk drive before partitioning it and installing Windows 10 – this is always a good thing to doWhen you’re ready to proceed with the Windows 10 installation, click on ‘Continue’
In the following window, click on the ‘Choose’ button and navigate to the Windows 10 ISO file we made in this guide previouslySet the Windows partition size; keep in mind that you will not be able to change this once the installation process is finished, so make sure to create a partition with enough space for your needsOnce you’ve set everything up, click on ‘Install’; the Boot Camp Assistant application will then take over for you and create the Windows partition, as well as download Windows support softwareUpon the creation of the Windows partition, you’ll be prompted to enter your administrator password; after inputting it, your Mac computer will restart in order to load the Windows ISOOnce your Mac device restarts and loads the Windows ISO, follow the on-screen instructions in order to go through the process of installing Windows 10 – here, you will be prompted to put in your Windows 10 product key you purchased prior to starting the installation processIf asked for the location where Windows should be installed, choose the ‘BOOTCAMP’ partition and click ‘Format’; the correct partition should be formatted automatically in most cases, according to Apple.
Check your new windows 10 on your Mac
After this, you’ll want to make sure that Windows is up to date, along with the necessary software it needs to run properly. Follow the steps below in order to do that:
Click the ‘Start’ button, type in ‘Settings’ and press Enter
Click on ‘Update and Security’
Click ‘Check for Updates’
Windows 10 will then proceed to check for updates, and if it finds any drivers or other necessary software out of date it will automatically download and install required updates. Depending on your hardware and internet speed, the time this process takes may vary. Note that your Mac computer will still boot into macOS by default, even after you install Windows 10. If you want to boot into Windows 10 by default instead, follow these steps inside macOS: Once the device is rebooted, you should be greeted by Windows 10’s login screen, rather than macOS. And with that, we’ve gone through the entire process of installing Windows 10 on a Mac computer.
Editors’ Recommendation
How To Access The Hidden Library Folder On Your MacOSHow To Set Up & Use MacOS Dictation To Rest Your Fingers
Δ Contact Us :- trendblog.guest@gmail.com